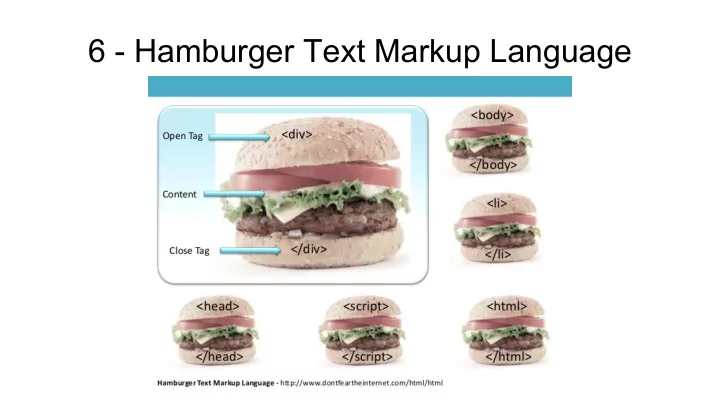

6 - Hamburger Text Markup Language
Recap and Agenda Last session, we talked about: - Higher-order functions: functions that transform functions! - Datatypes: how to represent information in our programs. Today, we’re going to talk about: - The syntax of HTML - What content we want to put on our websites.
What do you want your page to look like? The first step of any project is planning out what you want your site to be all about! Discussing with your groups and writing your answers if that works best for you, answer the following questions: 1) What do you want your site to be about? 2) What are all the pages you’ll need to have for your site? (Ex. about me, homepage, contact page, resume page, gallery/portfolio of works page)
Getting set up To start any new project, we’re going to have to make a directory to work in! If you don’t have one already, you might want to make a more general directory where you’ll put all of your projects, by writing this in the command line: mkdir projects We’re going to create more directories in projects, so make sure to cd projects
Commands commands commands Next we’ll need to make a directory for our website, as well as another directory in this directory to house your code! That commands should look like this: mkdir website Remember to cd into this directory using cd website mkdir site Again, remember to cd into this directory using cd site
Starting our code!! With all the set up done, it’s time to start coding in HTML! To start, make sure your current directory is something like ~/projects/website/site Now let’s make a file in /site that will be your first HTML page! Woohoo! You can call your working file whatever you please, it just must end in .html . The command to create and edit this file should look like: nvim index.html We’re ready to start coding B)
Syntax The first thing we need to write at the top of our file is <!doctype html> . This tells the browser that this document is written in HTML5, a version of HTML. What your code should look like An important thing to notice about this code is that the doctype html is surrounded by angle brackets (< and >). Why is this?
It really is like a hamburger! In HTML, there are tags which generally contain other content such as text, links, paths to images, or more tags. Tags have an opening form and a closing form, and the content goes between the two. close open <html> </html> Everything you write in HTML will be inside a tag, so get used to them!
It’s tags all the way down Like we just saw, the next thing we’ll need to add to our code is the html tag. This tag will denote the start and end of all your code, so make sure everything you write is inside these tags!
Giving it a little body Now all the syntax is set up, it’s time to give this page some content! Much like an essay, we’re going to have to add a body to your page, using the body tag. Inside this tag, write whatever you want to show up on your page! Your complete code should look like this:
Great! Now let’s view our page. We don’t have a graphical Linux system, so we can’t view web pages on it. Instead, you’ll view your pages on your host system (MacOS / Windows). We’ll host (this word gets used a lot ) a basic web server on our Linux machine, and connect to it from our host machine . (Phew!) This will let us view our page. We’ll actually use a Python program to do the hosting, so let’s install Python: sudo pacman -S python
IP addresses In order to connect to our VM, we need to configure a rule in VirtualBox to send certain network traffic from our host machine to our VM. We need to know our VM’s IP address to do this, so we can specify where exactly to send the traffic!
Run the command ip address to see all the addresses configured on the VM. There should be a section labelled enp0s3 ; this is the name of the virtual network card in our VM. There should be a field labelled inet followed by four numbers separated by dots. That’s our IP address ! Take note of it.
Forward mail to 10.0.2.15 please! Select Machine > Settings > Network > Advanced > Port Forwarding and click the plus. Fill in the following: Name: web Protocol: TCP Host IP: 127.0.0.1 Host port: 8000 Guest IP: your VM’s IP address Guest port: 8000
Now let’s really view our page!! In ~/projects/website/site , run: python -m http.server 8000 You should see Serving HTTP on 0.0.0.0 port 8000 On your host machine, in your browser, visit: http://localhost:8000/ You should see your site!
Some more things to add to our page Please direct yourself to the following page: https://www.w3schools.com/html/ On the toolbar to the left are a bunch of tutorials to get you comfortable with different tags and its uses in HTML. We don’t have enough time to cover them all; instead, you will choose one tutorials (in a green box) from this list, implement in it on your site, and share your findings with the class.
We did it! Today we talked about: - The syntax and structure of HTML documents. - How to communicate between our VM and our host. - Different concepts in HTML such as headings, paragraphs, and colors! Next time, we’ll see how to make really pretty websites using CSS , a language for describing how things should look .
We’ll code a small shell script together to run the web server. Let’s do this together! In the website directory: nvim debug.sh
Recommend
More recommend