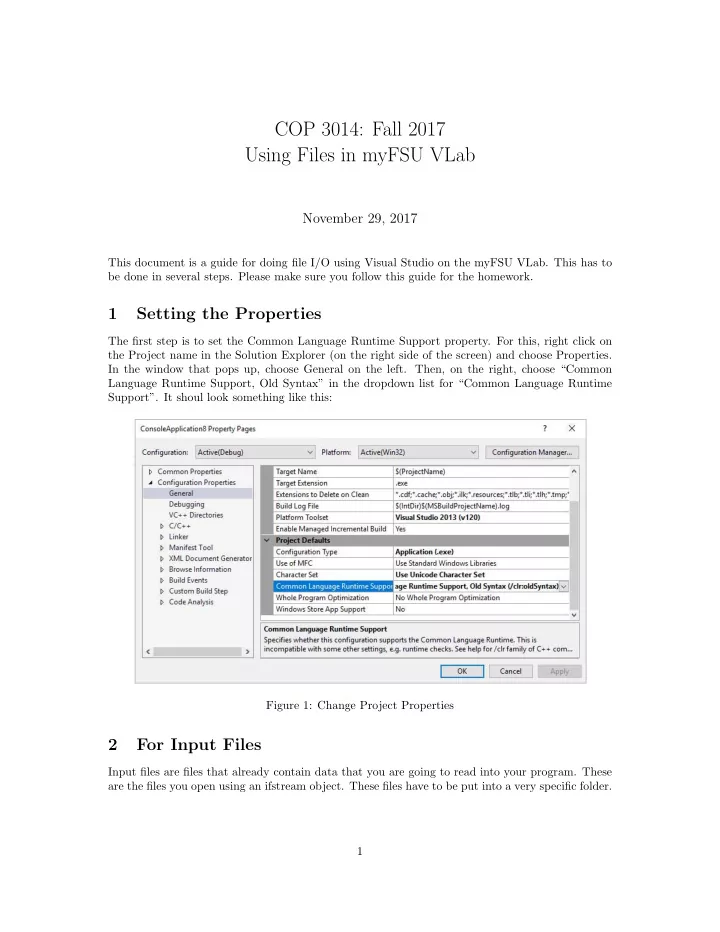

COP 3014: Fall 2017 Using Files in myFSU VLab November 29, 2017 This document is a guide for doing file I/O using Visual Studio on the myFSU VLab. This has to be done in several steps. Please make sure you follow this guide for the homework. 1 Setting the Properties The first step is to set the Common Language Runtime Support property. For this, right click on the Project name in the Solution Explorer (on the right side of the screen) and choose Properties. In the window that pops up, choose General on the left. Then, on the right, choose “Common Language Runtime Support, Old Syntax” in the dropdown list for “Common Language Runtime Support”. It shoul look something like this: Figure 1: Change Project Properties 2 For Input Files Input files are files that already contain data that you are going to read into your program. These are the files you open using an ifstream object. These files have to be put into a very specific folder. 1
Go to File - > New - > File. In the window that pops up, chose “Text File” and click Open. This will open a blank Text File and Visual Studio will give it its own name, usually “TextFilex.txt”. Figure 2: Open a New Text File The blank file will be open in your project main window. Copy-paste the contents of the input file (what we’ve given you into this blank file. You would have to go through the clipboard. Once you have pasted/typed in the file and the input file looks like it is supposed to, go to File - > Save < Filename > As. In the window that pops up, change the name of the file to the required name (the one you will be using in the program). Then, double click on the folder with the same name as the project. In the example below, the project was called ConsoleApplication9, so we open the folder ConsoleApplication9. The correct folder should contain a folder called Debug, any other text files we have already created, and NOTHING ELSE, when the File Type is “Text Files (.txt)”. Click on “Save”. Your input file is ready for use. Figure 3: Saving an input file 2
3 For Output Files Output files are files you would be printing to in your program. These are the files you open using an ofstream object. These files will automatically be put into a very specific folder by Visual Studio. You can just write the program normally, and open the file and print to it. Once the program is done, you need to check the output file to verify your output. To open that file, go to File - > Open - > File. In the window that pops up, go to the Folder that contains a Folder called “Debug” and no other folders. If it contains two folders, one called “Debug” and one with the same name as the project, then move into the folder with the same name as the project. You will find the output file in the folder and you can open it. Figure 4: Opening an output file 4 Running the program When we run the program, we need to choose “Start Debugging” instead of “Start Without De- bugging”. If a file that is already opened, Visual Studio will ask if you would like to update the file. Say Yes. 3
Recommend
More recommend