Viewing in 3D (Chapt. 6 in FVD, Chapt. 12 in Hearn & Baker) - PDF document
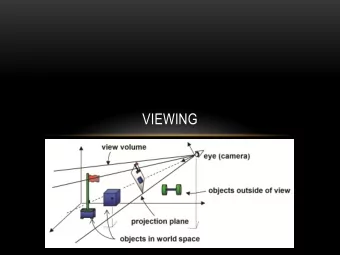
Viewing in 3D (Chapt. 6 in FVD, Chapt. 12 in Hearn & Baker) Specifying the Viewing Coordinates Viewing Coordinates system , [x v , y v , z v ], describes 3D objects with respect to a viewer. A viewing plane ( projection plane ) is
Viewing in 3D (Chapt. 6 in FVD, Chapt. 12 in Hearn & Baker) Specifying the Viewing Coordinates • Viewing Coordinates system , [x v , y v , z v ], describes 3D objects with respect to a viewer. • A viewing plane ( projection plane ) is set up perpendicular to z v and aligned with (x v ,y v ). • To set a view plane we have to specify a view-plane normal vector, N, and a view-up vector, V, (both, in world coordinates):
z w y v v P x v N P 0 z v y w x w e n a l p w e i V • P 0 =(x 0 ,y 0 ,z 0 ) is a point where a camera is located. • P is a point to look-at. • N=(P 0 -P)/|P 0 -P| is the view-plane normal vector. • V=z w is the view up vector, whose projection onto the view- plane is directed up. • How to form Viewing coordinate system : × N V N = = = × ; ; z x y z x v v × v v v N V N • The transformation, M, from world-coordinate into viewing- coordinates is: − 1 2 3 1 0 0 x x x x 0 0 v v v − 1 2 3 0 1 0 y y y y 0 = 0 = ⋅ v v v M R T − 1 2 3 0 0 1 0 z z z z 0 v v v 0 0 0 1 0 0 0 1
Projections • Viewing 3D objects on a 2D display requires a mapping from 3D to 2D. • A projection is formed by the intersection of certain lines ( projectors ) with the view plane. • Projectors are lines from the center of projection through each point in the object. Center of Projection • Center of projection at infinity results with a parallel projection. • A finite center of projection results with a perspective projection.
• A parallel projection preserves relative proportions of objects, but does not give realistic appearance (commonly used in engineering drawing). • A perspective projection produces realistic appearance, but does not preserve relative proportions. Parallel Projection • Projectors are all parallel. • Orthographic: Projectors are perpendicular to the projection plane. • Oblique: Projectors are not necessarily perpendicular to the projection plane. Orthographic Oblique
Orthographic Projection • Since the viewing plane is aligned with (x v ,y v ), orthographic projection is performed by: 1 0 0 0 x x x p v v 0 1 0 0 y y y p = v = v 0 0 0 0 0 0 z v 1 1 0 0 0 1 1 (x,y,z) (x,y) y v x v P 0 z v • Lengths and angles of faces parallel to the viewing planes are preserved. • Problem : 3D nature of projected objects is difficult to deduce. T o p V i e w Side View Front view
Oblique Projection • Projectors are not perpendicular to the viewing plane. • Angles and lengths are preserved for faces parallel to the plane of projection. • preserves 3D nature of an object. y v (x p ,y p ) x v (x,y,z) (x,y) φ + φ x 1 0 a cos 0 x x z a cos p v v v φ + φ 0 1 sin 0 sin y a y y z a p v v v = = 0 0 0 0 0 0 z v 1 0 0 0 1 1 1 • Two types of oblique projections are commonly used: – Cavalinear: α=45 ο = tan −1 (1) – Cabinet: α= tan -1 (2) 1/a=tan( α ) z/b= 1/a b=za (x p ,y p ) x p =z ⋅ a ⋅ cos( φ ) α y p =z ⋅ a ⋅ sin( φ ) y v b x v a φ (x,y,z) (0,0,1) (x,y)
• Cavalinear projection : – Preserves lengths of lines perpendicular to the viewing plane. – 3D nature can be captured but shape seems distorted. • Cabinet projection: – lines perpendicular to the viewing plane project at 1/2 of their length. – A more realistic view than the Cavalinear projection. y 1 1 1/2 1 x x 1 1 45 ° 45 ° z z Cavalinear Projection Cabinet Projection Perspective Projection • In a perspective projection, the center of projection is at a finite distance from the viewing plane. • Parallel lines that are not parallel to the viewing plane, converge to a vanishing poin t. – A vanishing point is the projection of a point at infinity. Z-axis vanishing point y x z
Vanishing Points • There are infinitely many general vanishing points. • There can be up to three axis vanishing points (principal vanishing points). • Perspective projections are categorized by the number of principal vanishing points, equal to the number of principal axes intersected by the viewing plane. • Most commonly used: one-point and two-points perspective. y x z One point (z axis) perspective projection x axis z axis vanishing point. vanishing point. Two points perspective projection
(x,y,z) (x p ,y p ,0) y d x center of projection z x (x,y,z) x p z d • Using similar triangles it follows: x y x y p = p = ; + + d z d d z d ⋅ ⋅ d x d y = = = ; ; 0 x y z p + p + p z d z d • Thus, a perspective projection matrix is defined: 1 0 0 0 0 1 0 0 = M per 0 0 0 0 1 0 0 1 d 1 0 0 0 x x 0 1 0 0 y y = = M per P 0 0 0 0 0 z + 1 z d 0 0 1 1 d d ⋅ ⋅ d x d y = = = ; ; 0 x y z p + p + p z d z d
Observations • M per is singular (|M per |=0), thus M per is a many to one mapping (for example: M per P=M per 2P). • Points on the viewing plane (z=0) do not change. • The vanishing point of parallel lines directed to (U x ,U y ,U z ) is at [dU x /U z , dU y /U z ]. • When d ∞ , M per M ort What is the difference between moving the center of projection and moving the projection plane? Original z Projection Center of plane Projection Moving the Center of Projection z Center of Projection Projection plane Moving the Projection Plane z Projection Center of plane Projection
Summary Planar geometric projections Parallel Perspective One point Oblique Orthographic Front Top Two Cavalinear Other point Side Cabinet Other Three point Demo
View Window • After objects were projected onto the viewing plane, an image is taken from a View Window . • A view window cab be placed anywhere on the view plane. • In general the view window is aligned with the viewing coordinates and is defined by its extreme points: (xw min ,yw min ) and (xw max ,yw max ) View plane y v x ) x ,yw a m (xw m a x v View window z v (xw min ,yw min ) View Volume • Given the specification of the view window, we can set up a View Volume . • Only objects inside the view volume will appear in the display, the rest are clipped.
• In order to limit the infinite view volume we define two additional planes: Near Plane and Far Plane . • Only objects in the bounded view volume will appear. • The near and far planes are parallel to the view plane and specified by z near and z far . • A limited view volume is defined: – For orthographic: a rectangular parallelpiped. – For oblique: an oblique parallelpiped. – For perspective: a frustum. Far z v Plane Near Plane w o d z v n w i w Far o d n i w Near Plane Plane Canonical View Volumes • In order to determine the objects that are seen in the view window we have to clip objects against six planes forming the view volume. • Clipping against arbitrary 3D plane requires considerable computations. • For fast clipping we transform the general view volume to a canonical view volume against which clipping is easy to apply. Viewing Coordinates Canonical view Transformation Clipping Projection Transformation
Canonical Volume for General Parallel-Projection z v z v window window Oblique Projection Shear Depth preserving Shear transformation: φ + φ 1 0 cos 0 cos x a x x z a c v v v φ + φ 0 1 sin 0 sin y a y y z a = = c v v v 0 0 1 0 z z z c v v 1 0 0 0 1 1 1 top right y v x v z v bottom near left far Translation: + + r l r l x ' − x − 1 0 0 c c x c 2 2 + + t b t b ' y − y − c 0 1 0 c y c = = 2 2 + + f n f n z ' z c c + 0 0 1 z c 2 2 1 1 0 0 0 1 1 z v z v window Translation
Recommend
More recommend
Explore More Topics
Stay informed with curated content and fresh updates.

