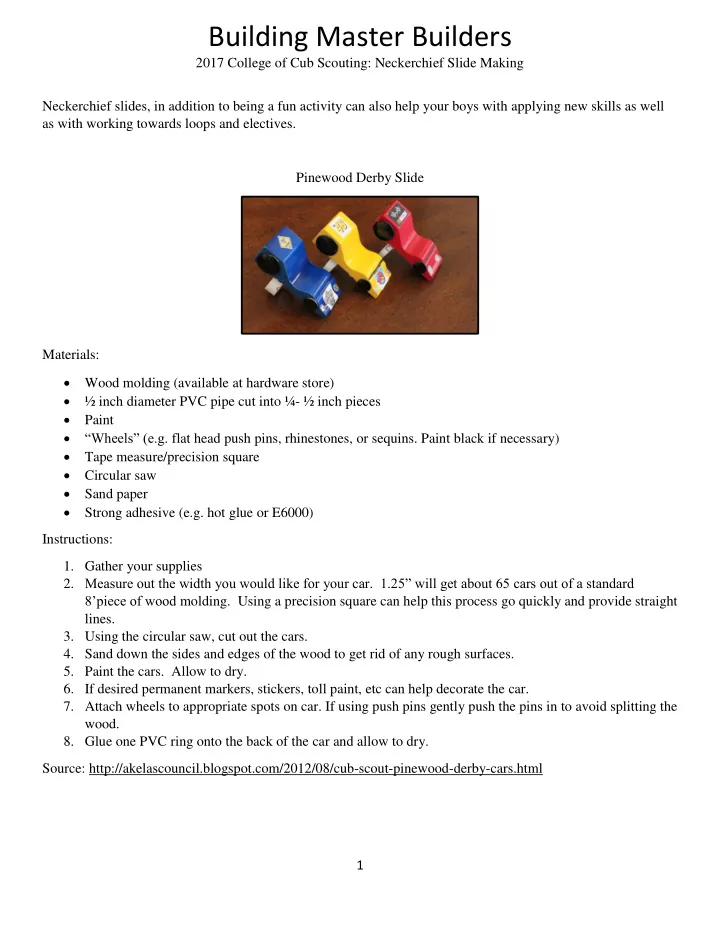

Building Master Builders 2017 College of Cub Scouting: Neckerchief Slide Making Neckerchief slides, in addition to being a fun activity can also help your boys with applying new skills as well as with working towards loops and electives. Pinewood Derby Slide Materials: • Wood molding (available at hardware store) • ½ inch diameter PVC pipe cut into ¼- ½ inch pieces • Paint • “Wheels” (e.g. flat head push pins, rhinestones, or sequins. Paint black if necessary) • Tape measure/precision square • Circular saw • Sand paper • Strong adhesive (e.g. hot glue or E6000) Instructions: 1. Gather your supplies 2. Measure out the width you would like for your car. 1.25” will get about 65 cars out of a standard 8’piece of wood molding. Using a precision square can help this process go quickly and provide straight lines. 3. Using the circular saw, cut out the cars. 4. Sand down the sides and edges of the wood to get rid of any rough surfaces. 5. Paint the cars. Allow to dry. 6. If desired permanent markers, stickers, toll paint, etc can help decorate the car. 7. Attach wheels to appropriate spots on car. If using push pins gently push the pins in to avoid splitting the wood. 8. Glue one PVC ring onto the back of the car and allow to dry. Source: http://akelascouncil.blogspot.com/2012/08/cub-scout-pinewood-derby-cars.html 1
2017 College of Cub Scouting: Neckerchief Slide Making Blue and Gold Bead Slide By Krista Palo Materials: • 30 beads (15 blue, 15 yellow if using an alternating pattern) • 2 24" long strings of boondoggle craft cord • Scissors Instructions 1. String the first row of three beads onto a cord and push to the center of the cord. Lace the 2nd row of beads onto another cord. (Fig. 1) 2. Lace the other cord through the same beads in reverse order. Pull both cords snugly. (Fig. 2 & 3) 3. Continue with the next row of beads until you have 10 laced rows, 5 out from one side and 5 from the other. (Fig 4) 4. Loop beads around and string one cord through the first row of beads. Tie cords together pulling tight. ( Fig. 5 & 6 ) 5. Push loose ends into the next row of beads. Repeat with the other three strings. (Fig. 7) 6. Pull strings really tight and snip. (Fig. 8) Fig. 3 Fig. 1 Fig. 2 Fig. 4 Fig. 6 Fig. 5 Fig. 7 Fig. 8 Source: http://ahandfulofeverything.blogspot.com/2012/11/bead-cub-scout-neckerchief-slide. 2
2017 College of Cub Scouting: Neckerchief Slide Making Dutch Oven Slide By Shannon Johnson Materials: • bottle caps (paint them black if you need) • small black pony beads • thin gauge wire • wire cutters • dried lentils/beans (red, white, rice, etc.) • white school glue • hot glue gun Instructions: 1. Glue 3-4 small pony beads on the bottom. These are the feet of the oven. 2. Cut the wire to an appropriate length and glue in the lid. This is the handle. 3. Mix your lentils with white school glue. A small paper cup and a wooden craft stick works great here. 4. Fill the caps with small amounts of "soup" mix. Some of the moisture from the glue may be absorbed but things should still dry well. 5. After they have dried completely glue your attachment to the back. You can use thin slices of PVC pipe, or small hair bands. For step by step picture instructions visit the source website. Source: http://4growingboys.blogspot.com/2013/02/cub-scouts-neckerchief-slides-dutch-oven.html 3
2017 College of Cub Scouting: Neckerchief Slide Making Warm Fuzzies By Shannon Johnson Materials: • 1 large pom pom • 2 small pom poms • 1-inch pipe cleaner • Googly eyes • Fast drying glue • A loop for the back. Can be pipe cleaners, PVC pipe, etc Instructions: 1. Fold pipe cleaner in half and glue to top of large pom pom (see picture). Hot glue may work best here as other glues may take a while to set. 2. Glue smaller pom poms to the top of each end of the pipe cleaner. 3. Glue googly eyes to front of large pom pom. 4. Glue loop to the back to finish the slide. Source: http://4growingboys.blogspot.com/2014/02/warm-fuzzy-neckerchief-slides.html 4
2017 College of Cub Scouting: Neckerchief Slide Making American Flag Slide By Pam Dana Materials: 8 - 2″ Safety Pins (Size 3) 9 blue Pony Beads 12 red Pony Beads 15 white Pony Beads 1 – 3/ 4″ diameter PVC pipe cut approx. 1/2″ thick Instructions: 1. Take 6 of the safety pins (save the other 2 for the end) and create the following six combinations: 3 pins with the pattern: 3 blue, white, red, white 3 pins with the pattern: red, white, red, white, red, white. 2. You will want to add the PVC Pipe to one of the red/white pins. When feeding the beads onto the pin, have the boys keep the same side of the pin as the top. You want to make sure that the white beads are on the side of the pin that closes 3. Line the rows up like so it looks like the picture above. 4. Take one of the extra safety pins and feed it through the loop on the flag pins in order. 5. Take the last safety pin and feed it through the other end of the pins. It doesn’t matter which side of the pin is up or down. Just th at the “ends” (loops/closure) are all matching. Source: https://overthebigmoon.com/american-flag-neckerchief-slide-cub-scouts/ 5
2017 College of Cub Scouting: Neckerchief Slide Making Tips and Tricks Source: http://www.u-createcrafts.com/craft-adhesive-guide/ http://www.e-scoutcraft.com/general/general.html This site contains general information. It contains sections on making the rings that hold the slide onto the neckerchief, what glues to use on which materials, and where to get free materials. If you have further questions about the demonstration on 10/14/17; you may contact M&M Thompson: at fmthompson@comcast.net 6
Recommend
More recommend