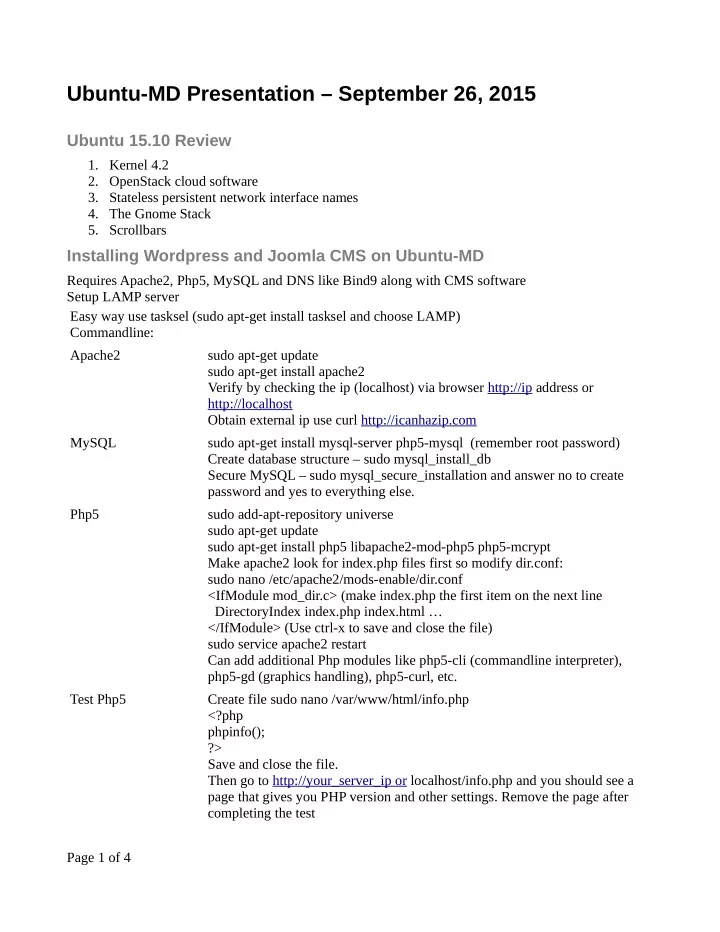

Ubuntu-MD Presentation – September 26, 2015 Ubuntu 15.10 Review 1. Kernel 4.2 2. OpenStack cloud software 3. Stateless persistent network interface names 4. The Gnome Stack 5. Scrollbars Installing Wordpress and Joomla CMS on Ubuntu-MD Requires Apache2, Php5, MySQL and DNS like Bind9 along with CMS software Setup LAMP server Easy way use tasksel (sudo apt-get install tasksel and choose LAMP) Commandline: Apache2 sudo apt-get update sudo apt-get install apache2 Verify by checking the ip (localhost) via browser http://ip address or http://localhost Obtain external ip use curl http://icanhazip.com MySQL sudo apt-get install mysql-server php5-mysql (remember root password) Create database structure – sudo mysql_install_db Secure MySQL – sudo mysql_secure_installation and answer no to create password and yes to everything else. Php5 sudo add-apt-repository universe sudo apt-get update sudo apt-get install php5 libapache2-mod-php5 php5-mcrypt Make apache2 look for index.php files first so modify dir.conf: sudo nano /etc/apache2/mods-enable/dir.conf <IfModule mod_dir.c> (make index.php the first item on the next line DirectoryIndex index.php index.html … </IfModule> (Use ctrl-x to save and close the file) sudo service apache2 restart Can add additional Php modules like php5-cli (commandline interpreter), php5-gd (graphics handling), php5-curl, etc. Test Php5 Create file sudo nano /var/www/html/info.php <?php phpinfo(); ?> Save and close the file. Then go to http://your_server_ip or localhost/info.php and you should see a page that gives you PHP version and other settings. Remove the page after completing the test Page 1 of 4
Ubuntu-MD Presentation – September 26, 2015 Wordpress Installing Download latest version cd to /tmp wget http://wordpress.org/latest.tar.gz extract tar -xvzf latest.tar.gz Move wordpress folder Use sudo mv wordpress/* /var/www/html/ contents to Apache2 root Create wordpress database Use mysql -u root -p CREATE DATABASE wpdb; Now create a new wpdb user: CREATE USER wpuser@localhost IDENTIFIED BY 'new_password_here'; Then give new user full control on wpdb: GRANT ALL ON wpdb.* to wpuser@localhost; FLUSH PRIVILEGES; (to apply changes and exit) Configuring Wordpress Make a copy of the wp-sample config file so it can be used to access your database: sudo cp /var/www/html/wp-config-sample.php /var/www/html/wp- config.php Edit it sudo nano /var/www/html/wp-config.php (change the following lines to match your credentials) define ('DB_NAME','wpdb'); define('DB_USER','wpuser'); define('DB_PASSWORD', 'password'); Save and close the file (Crtl-x) Grant Apache2 permissions sudo chown -R www-data:www-data /var/www/html/ sudo chmod -R 755 /var/www/html sudo service apache2 restart Access Wordpress http://ip_server or localhost/wp-admin/install.php and follow the wizard to complete the setup of your wordpress site. Page 2 of 4
Ubuntu-MD Presentation – September 26, 2015 Joomla CMS Setup Download the latest version Use wget https://github.com/joomla/joomla- cms/releases/download/3.4.4/Joomla_3.4.4-Stable-Full_Package.zip create a dir and move it to that directory: mkdir Joomla-latest-34 cp Joomla_3.4.4-Stable-Full_Package.zip Joomla-latest-34/ cd Joomla-latest-34 unzip Joomla_3.4.4-Stable-Full_Package.zip sudo mkdir /var/www/html/newsitename sudo cp -a Joola-latest-34/* /var/www/html/newsitename/ Create Joomla site database Use mysql -u root -p CREATE DATABASE joomladb; Now create a new wpdb user: CREATE USER joomlauser@localhost IDENTIFIED BY 'new_password_here'; Then give new user full control on wpdb: GRANT ALL ON joomladb.* to joomlauser@localhost; FLUSH PRIVILEGES; (to apply changes and exit) Apache2 Permissions sudo chown -R www-data:www-data /var/www/html/newsitename sudo chmod -R 755 /var/www/html/newsitename sudo service apache2 restart Configure Joomla Site Go to http://ip_server(or localhost)/newsitename/index.php Additional server configuration On Ubuntu 14.04 servers apache2 will not be default show webservers using just ip address. You will need to setup local domain names: Create the domain name file sudo nano /etc/apache2/sites- available/wordpress-test.com.conf <VirtualHost *:80> ServerAdmin rswift@swiftstaffing.com ServerName www.wordpress-test.com ServerAlias wordpress-test.com www.wordpress-test.com DocumentRoot /var/www/html/wordpress-test DirectoryIndex index.php default.php ErrorLog /var/log/apache2/wordpress-test.error.log TransferLog /var/log/apache2/wordpress-test.transfer.log </VirtualHost> Save and exit sudo a2ensite wordpress-test.com Page 3 of 4
Ubuntu-MD Presentation – September 26, 2015 sudo service apache2 restart Lastly create an entry in your /etc/hosts file if accessing the website from a workstation on the same LAN like this: sudo nano /etc/hosts server-ip-address wordpress-test.com Save and exit Now you can access your new website from your workstation on the same LAN by using http://www.wordpress-test.com Page 4 of 4
Recommend
More recommend