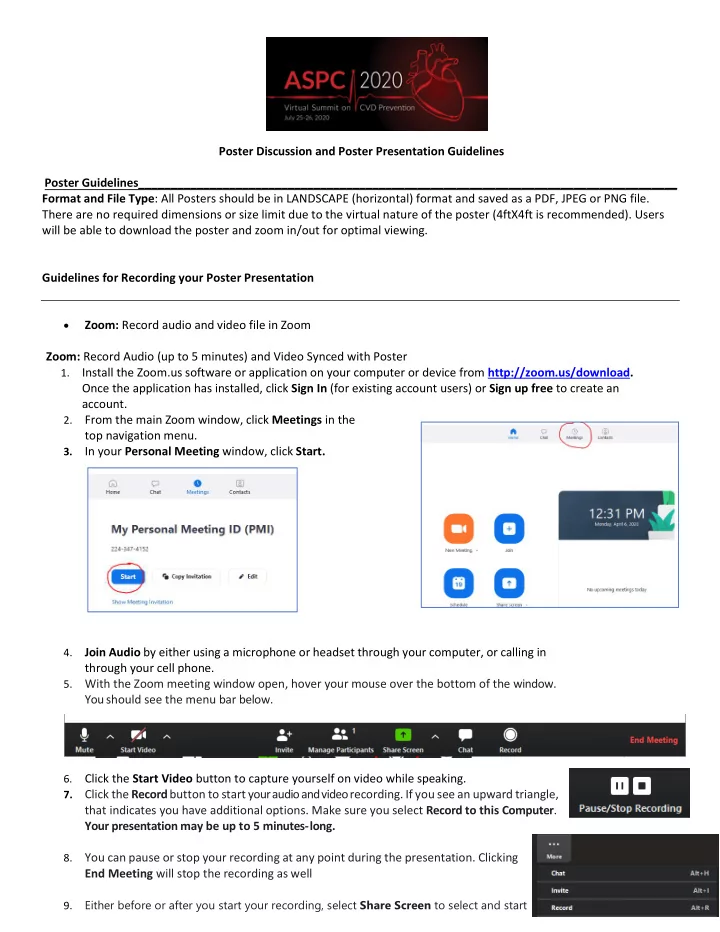

Poster Discussion and Poster Presentation Guidelines Poster Guidelines___________________________________________________________________________________ Format and File Type : All Posters should be in LANDSCAPE (horizontal) format and saved as a PDF, JPEG or PNG file. There are no required dimensions or size limit due to the virtual nature of the poster (4ftX4ft is recommended). Users will be able to download the poster and zoom in/out for optimal viewing. Guidelines for Recording your Poster Presentation • Zoom: Record audio and video file in Zoom Zoom: Record Audio (up to 5 minutes) and Video Synced with Poster Install the Zoom.us software or application on your computer or device from http://zoom.us/download. 1. Once the application has installed, click Sign In (for existing account users) or Sign up free to create an account. From the main Zoom window, click Meetings in the 2. top navigation menu. In your Personal Meeting window, click Start. 3. Join Audio by either using a microphone or headset through your computer, or calling in 4. through your cell phone. With the Zoom meeting window open, hover your mouse over the bottom of the window. 5. You should see the menu bar below. Click the Start Video button to capture yourself on video while speaking. 6. Click the Record button to start your audio and video recording. If you see an upward triangle, 7. that indicates you have additional options. Make sure you select Record to this Computer . Your presentation may be up to 5 minutes- long. 8. You can pause or stop your recording at any point during the presentation. Clicking End Meeting will stop the recording as well Either before or after you start your recording, select Share Screen to select and start 9.
sharing the screen with your poster. Once you start sharing your screen, the menu will move to the top of your screen. You can start your recording after sharing your screen by going to More and selecting Record . 10. To stop your audio/video recording, click Stop Recording, then Stop Sharing your Screen. After your recording is complete, go to Meetings (1) at the top of the Zoom window. To see your recordings, click on the tab labeled Recorded (2) . After you select the presentation you want to view, click Open (3) . This will open the folder where the recording is saved. By default, the recordings are saved in your Documents folder in a sub-folder called Zoom. 11. If you recorded to the Zoom Cloud, clicking open will redirect you to your Zoom web account. Verify that your client has been upgraded to a supported version before you start the meeting. The supported versions are: Windows: Version 4.0.25513.0228 or later and Mac: Version 4.0.25513.0228 or later. 12. Please rename the “Zoom” file (MP4 format) to “ASPCAbstract_YourLastName and poster number” then upload to Click here to upload video. Troubleshooting Common Issues in Zoom: • Audio Issues: Before starting your presentation, test the audio by selecting Test Speaker and Microphone , and follow the instructions on the screen. • Video Issues: Make sure your camera is turned on, plugged in, and selected in Zoom by choosing the video icon. If it is not, use the drop down to select the correct camera. If the camera is turned on, make sure nothing is blocking the camera view. If using an external web camera, try connecting it to a different USB port and repeat steps.
Recommend
More recommend