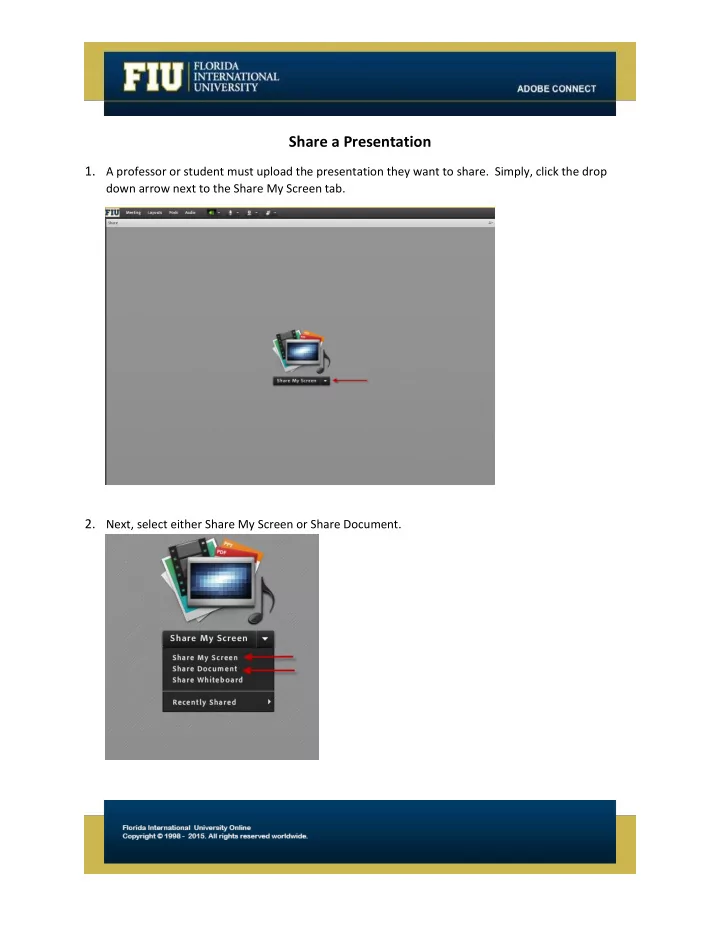

Share a Presentation 1. A professor or student must upload the presentation they want to share. Simply, click the drop down arrow next to the Share My Screen tab. 2. Next, select either Share My Screen or Share Document.
3. Choosing Share Document provides you with a list of PowerPoint presentations previously uploaded to the meeting. 4. The professor or student can select the presentation from the list or browse their computers.
5. A presentation layout has the following areas: the presentation which is the main part of the window that displays the presentation slides. 6. The presentation sidebar which is an area on the right side (default location) of the browser window that shows the name of the presentation, the presenter information, and the Outline, Notes, and Search tabs (if the tabs were included in presentation theme). If you cannot see the sidebar, click Show Sidebar to the lower-left of the presentation.
7. Finally, the presentation control bar which is located at the bottom of the presentation gives you control over the presentation playback, audio, attachments, and screen size. *This is visible to professors only, unless a professor chooses to display it to students. You may also need to click Sync to the lower right of the presentation. 8. P rofessors’ presentations may have an Outline tab on the sidebar. The Outline tab lists the title and duration of each slide. Professors can use the Outline tab to display information and to move to a specific slide in the presentation. *The current slide is highlighted with a glow color, which you can change in the theme.
9. You can choose to display the highlight outline to all students or to professors and presenters only. 10. Click the Outline tab in the sidebar at the right. To move to a slide in the presentation, click its title in the Outline tab. To show the full slide title, move the pointer over the title.
11. When creating a presentation in PowerPoint, professors can enter notes for individual slides. If any slide notes exist, they can be displayed in the presentation. Slide notes appear on the right side of the presentation window. 12. Instructors can click the Search tab in the sidebar on the right side, and type the text to search for directly into the text box. Next, click Search , and the search results are displayed below the text box. Click any slide title in the results list to display that slide.
13. Instructors can control the presentation appearance and playback by using the toolbar located at the bottom of the presentation. The Play/Pause option pauses and resumes play of the current slide. The Back option moves to the previous slide in the presentation. Instructors can use the Forward option to move to the next slide in the presentation. *The slide progress bar shows and controls the playback location within the current slide. The position marker moves as the slide plays. You can drag the marker arrow forward or back in the current slide to change your playback location. You can also click a specific location on the progress bar to move the slide marker position and slide playback there. 14. The current slide number shows the number of the currently displayed slide and the total number of slides (for example, 2/10).
15. Instructors can use the Status option to shows the status of the current slide, such as Playing, Stopped, No audio, or Presentation complete. 16. The time feature shows the current slide time and the total slide time as the slide plays (for example, 00.02/00.05).
17. The audio volume feature shows the volume level that is set for the slide. 18. Attachments, display a small window showing any attachments (for example, documents, spreadsheets, images, URLs) that have been added.
19. Instructors can use the Show/Hide sidebar option to show or hide their sidebar. If you encounter any technical difficulties or have any questions regarding displaying a presentation in your Share pod please contact FIU Online Support Services.
Recommend
More recommend