Ombea Response Creating a presentation A quick guide for colleagues - PDF document
Ombea Response Creating a presentation A quick guide for colleagues looking to use the Ombea Response (PowerPoint integration) audience response system to boost discussion and interactivity with students during their lectures. Creating an
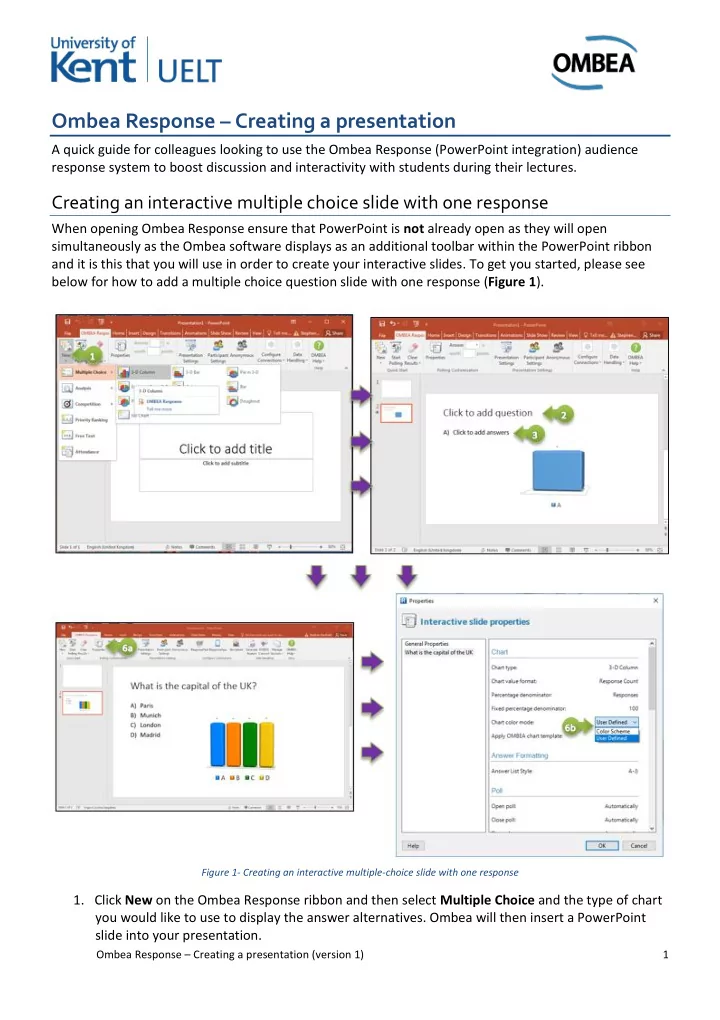
Ombea Response – Creating a presentation A quick guide for colleagues looking to use the Ombea Response (PowerPoint integration) audience response system to boost discussion and interactivity with students during their lectures. Creating an interactive multiple choice slide with one response When opening Ombea Response ensure that PowerPoint is not already open as they will open simultaneously as the Ombea software displays as an additional toolbar within the PowerPoint ribbon and it is this that you will use in order to create your interactive slides. To get you started, please see below for how to add a multiple choice question slide with one response ( Figure 1 ). Figure 1- Creating an interactive multiple-choice slide with one response 1. Click New on the Ombea Response ribbon and then select Multiple Choice and the type of chart you would like to use to display the answer alternatives. Ombea will then insert a PowerPoint slide into your presentation. 1 Ombea Response – Creating a presentation (version 1)
2. Type a question where it reads Click to add question . 3. Type up to 10 answer alternatives where it reads Click to add answers . Press Return to enter new answer alternatives. 4. With your mouse cursor click outside the answers box and after a moment the chart will update and display the answer alternatives you have given. 5. If you wish to add/remove or change any of the answer alternatives, just edit the text and when you click away from the answers box the chart will update to reflect the changes made. 6. In order to further amend settings such as giving correct answers a points value and deciding whether polling is opened and closed automatically or manually when you arrive at the slide in your presentation, you will need to click on Properties in the Ombea ribbon and set these options from the drop-down menus. Repeat steps 1-6 to add subsequent multiple choice slides. To visually highlight the correct answer to students in the chart displayed following polling, click on Properties in the Ombea ribbon and under the Chart menu change the Chart colour mode to User defined and change the colour of the correct answer (listed at the bottom of the Properties panel) to green for example. For more comprehensive guidance on other question types available and how to set these up participants are encourage d to engage with Ombea’s comprehensive online support guidebook (www.ombea.com/guide) and contact their Faculty Learning Technologist with any queries. For standard non-interactive slides, just create these in the usual way using standard PowerPoint functionality. Saving your presentation Once you have added all of your interactive slides to your presentation, save it in the usual way. It will then be saved as an ‘.ors’ file. If you wish to upload / share the presentation with students via your Moodle module, we recommend that you save and upload a ‘.ppt x ’ version for their reference . To do this, click File and Save as and select the .pptx file type. The interactive slides will then be saved as standard PowerPoint slides, which can be easily opened on students’ own devices. Testing your interactive slides Having saved your presentation, you can test that your interactive slides are working by using the Simulated polling functionality of Ombea. This is particularly useful to do before standing in front of a lecture theatre full of students! To do this, see Figure 2 : 1. Click the simulated icon on the Ombea ribbon. 2. Launch the presentation into Presentation mode. 3. Polling will automatically start and you will receive up to 100 responses. Figure 2 - Checking your interactive slides work using simulated polling 2 Ombea Response – Creating a presentation (version 1)
4. Click to progress the PowerPoint and a chart will display the results. 5. Once happy that all of your interactive slides are working, do not forget to Clear results of either all or individual interactive slides before saving the file. This will ensure that there is no polling data in the file that could interfere with that from your actual session. Clearing your data so you can reuse your slides If you are looking to use the same presentation for different groups of students, you will need to make copies of the file in order to keep the polling data separate. Having made another copy, you can clear the polling data by clicking Clear Results in the Ombea Response ribbon and choosing one of three options (see Figure 3 ): Figure 3 - Clearing your data so you can reuse your slides Session history – This will clear all voting data from the current Ombea Response presentation (most commonly used). All interactive slides – This will reset all the charts in your presentation. The voting data already collected is still there so if you were to run a report the questions would be reported on more than once. This option could be useful if you wish to poll the same questions again and see the two instances reported on separately. Selected Interactive slide – This will reset the current chart only in your presentation. Again, voting data already collected is still there so if you wanted to poll the same question again you could see the two instances reported on separately. Help and Support For more information and guidance in the use of the Ombea Response audience response system, please contact your Faculty Learning Technologist. Alternatively, please see our other guides that include: Ombea Response – Running a presentation Ombea Response – Producing reports Ombea Online Guidebook 3 Ombea Response – Creating a presentation (version 1)
Recommend


More recommend
Explore More Topics
Stay informed with curated content and fresh updates.