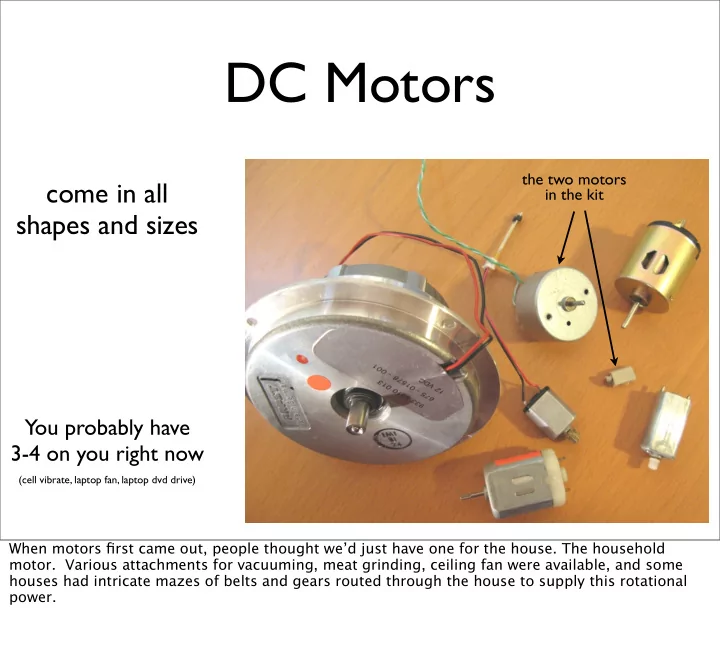

DC Motors the two motors come in all in the kit shapes and sizes You probably have 3-4 on you right now (cell vibrate, laptop fan, laptop dvd drive) When motors first came out, people thought we’d just have one for the house. The household motor. Various attachments for vacuuming, meat grinding, ceiling fan were available, and some houses had intricate mazes of belts and gears routed through the house to supply this rotational power.
DC Motors A dizzying array of parameters specify a motor • direct-drive vs. gearhead – built-in gears or not • voltage – what voltage it best operates at • current (efficiency) – how much current it needs to spin • speed – how fast it spins • torque – how strong it spins • oh, and also: size, shaft diameter, shaft length,etc. The two motors you have are small direct-drive, high-efficiency motors that work at 5 volts Gearhead motors are the best.
DC Motors Characteristics • When the first start up, they draw a lot more current, up to 10x more. • If you “stall” them (make it so they can’t turn), they also draw a lot of current • They can operate in either direction, by switching voltage polarity • Usually spin very fast: >1000 RPM • To get slower spinning, need gearing
DC Motors To drive them, apply a voltage The higher the voltage, the faster the spinning M battery DC motor polarity determines which way it rotates Try this out real quick. Then swap polarity Don’t let it go to long. These motors will work at 9V for awhile, but aren’t made to continuously run at that voltage.
DC Motors as Generators Just as voltage causes rotation... LED M DC motor ...rotation causes voltage Try it out, but you have to spin really fast to get it to light (if LED doesn’t This is used for “regenerative light, try spinning the other direction) braking” in electric & hybrid cars These high-e ffj ciency motors I gave you don’t generate much current (because they don’t use much current). I have a cheapy motor that lights LEDs better that I can show you.
Transistors Act like switches electricity flicks the switch instead of your finger collector collector TIP120 base base emitter emitter TIP120 base collector schematic symbol how it kind of works emitter Turning on the “base” connects the “collector” & “emitter” together The di fg erences between the pins are very important. The names aren’t that important, but their functions are. The “base” is the input that you use to open and close the “switch” across the “collector” and “emitter”. On this type of transistor (called an NPN), you need to make sure the collector is always more positive than the emitter. Generally you do this by connecting the emitter to ground.
Switching Motors with Transistors little motor big motor DC motor + DC motor M M + big power resistor resistor source transistor transistor switch switch + + + battery switching a different power source transistors switch big signals with little signals
Need a “Kickback” Diode diode DC motor diode M resistor line transistor switch + battery schematic symbol since motors can act like generators, need to prevent them from generating “kickback” into the circuit Once a motor starts spinning, its inertia keeps it spinning, this turns it into a generator and thus can generate a “kickback” voltage. The kickback diode routes that voltage harmlessly back into the motor so it can’t damage the rest of the circuit. Kickback is also called “back EMF” (EMF == electromotive force == voltage)
Controlling a Motor +5V motor +5V DC motor 1N4001 M Arduino board c b pin 9 TIP120 e 500 (green-brown-brown) gnd start with the tiny motor b c e Can control speed of motor with analogWrite() just like controlling brightness of LED Why 500 ohms? Because I have a lot of 500 ohm resistors. Typically you see 1k ohms. Anything 1k or below will work. The lower the value, the more current you’re “wasting” to turn on the transistor.
Wiring up Motor Circuit transistor turned around to make wiring easier e c b +5V +5V DC motor 1N4001 M Arduino board c b pin 9 TIP120 e 500 (green-brown-brown) white diode line into +5V gnd motor across diode
Sketch “SerialMotorSpeed” Type a number 0-9 in Serial Monitor to control the speed of the motor How would you change this to control the motor speed with the potentiometer?
Controlling a Bigger Motor Same circuit as before, different voltage source +9V battery +5V 9V +5V battery DC motor 1N4001 M Arduino board pin 9 TIP120 500 (green-brown-brown) gnd motor w/ tape propellor desk ding from motor getting loose Motor will spin faster for a given analogWrite() value Actually with both of the motors you have, you can run o fg the Arduino power supply. But many motors cannot because they either draw too much current or they need a voltage higher than 5 volts.
Fun Motor Attachments pipe cleaner squiggler tape propeller popsicle stick beater I’m terrible at mechanical engineering. If anyone has good ways of mounting things to motors, let me know. :-)
Wiring Up Bigger Motor Don’t just add 9V to +5v bus! Move the diode from +5 to another row Add red 9V wire to that row, Add black 9V wire to Gnd You might find it easier to push the red 9V wire in with the motor wire.
Can Switch Anything* +12V +5V red LEDs Arduino board 120 pin 9 TIP120 1k Super bright LED light gnd Full brightness control with PWM +5V 1N4004 5V relay Arduino board 1k to load: light bulb, car ignition, washing machine, etc. to load pin 7 TIP120 Relay switcher gnd Just on/off, and a relay needs a diode too *Anything up to about 1 amp. Need a bigger transistor or a relay after that
Recommend
More recommend