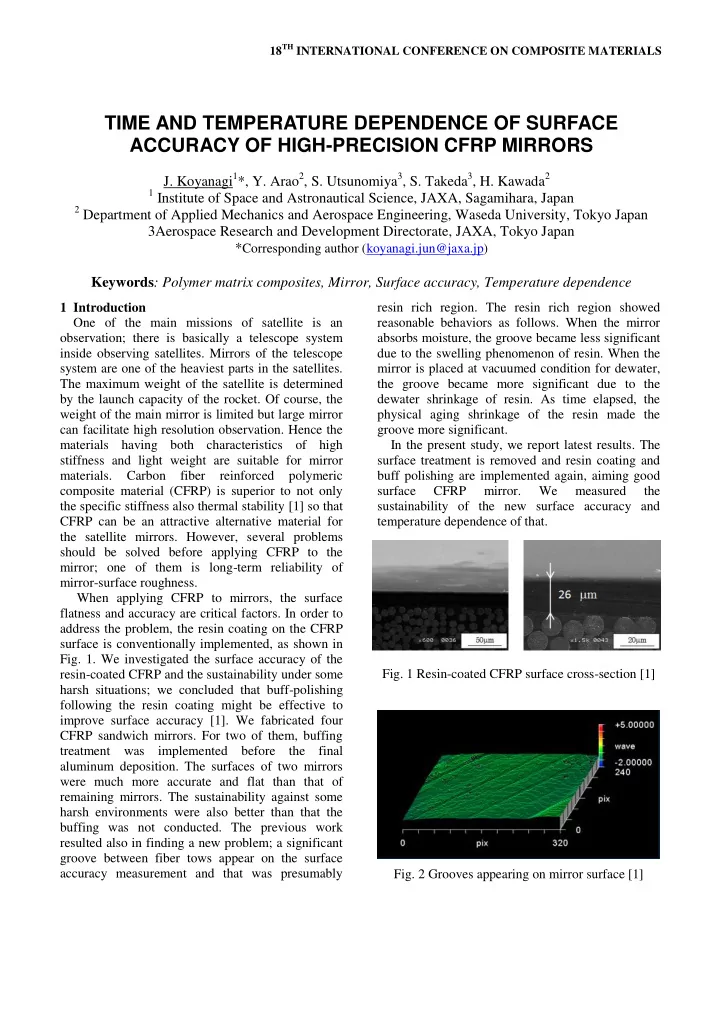

18 TH INTERNATIONAL CONFERENCE ON COMPOSITE MATERIALS TIME AND TEMPERATURE DEPENDENCE OF SURFACE ACCURACY OF HIGH-PRECISION CFRP MIRRORS J. Koyanagi 1 *, Y. Arao 2 , S. Utsunomiya 3 , S. Takeda 3 , H. Kawada 2 1 Institute of Space and Astronautical Science, JAXA, Sagamihara, Japan 2 Department of Applied Mechanics and Aerospace Engineering, Waseda University, Tokyo Japan 3Aerospace Research and Development Directorate, JAXA, Tokyo Japan * Corresponding author (koyanagi.jun@jaxa.jp) Keywords : Polymer matrix composites, Mirror, Surface accuracy, Temperature dependence resin rich region. The resin rich region showed 1 Introduction One of the main missions of satellite is an reasonable behaviors as follows. When the mirror observation; there is basically a telescope system absorbs moisture, the groove became less significant inside observing satellites. Mirrors of the telescope due to the swelling phenomenon of resin. When the system are one of the heaviest parts in the satellites. mirror is placed at vacuumed condition for dewater, The maximum weight of the satellite is determined the groove became more significant due to the by the launch capacity of the rocket. Of course, the dewater shrinkage of resin. As time elapsed, the weight of the main mirror is limited but large mirror physical aging shrinkage of the resin made the can facilitate high resolution observation. Hence the groove more significant. materials having both characteristics of high In the present study, we report latest results. The stiffness and light weight are suitable for mirror surface treatment is removed and resin coating and materials. Carbon fiber reinforced polymeric buff polishing are implemented again, aiming good composite material (CFRP) is superior to not only surface CFRP mirror. We measured the the specific stiffness also thermal stability [1] so that sustainability of the new surface accuracy and CFRP can be an attractive alternative material for temperature dependence of that. the satellite mirrors. However, several problems should be solved before applying CFRP to the mirror; one of them is long-term reliability of mirror-surface roughness. 26 m When applying CFRP to mirrors, the surface flatness and accuracy are critical factors. In order to address the problem, the resin coating on the CFRP surface is conventionally implemented, as shown in Fig. 1. We investigated the surface accuracy of the Fig. 1 Resin-coated CFRP surface cross-section [1] resin-coated CFRP and the sustainability under some harsh situations; we concluded that buff-polishing following the resin coating might be effective to improve surface accuracy [1]. We fabricated four CFRP sandwich mirrors. For two of them, buffing treatment was implemented before the final aluminum deposition. The surfaces of two mirrors were much more accurate and flat than that of remaining mirrors. The sustainability against some harsh environments were also better than that the buffing was not conducted. The previous work resulted also in finding a new problem; a significant groove between fiber tows appear on the surface accuracy measurement and that was presumably Fig. 2 Grooves appearing on mirror surface [1]
1. Fabricating front sheet 2. Fabricating back sheet 3. Bonding both side simultaneously Prepreg Honeycomb core Optical flat glass Super invar 4. Demold 5. Gel-coating (6. Buff polishing) 7. Aluminum evaporation Fig. 3 Fabrication procedure of CFRP sandwich mirror [1] 2 CFRP mirror fabrication [1] 3 Measurement Here, we briefly mention the fabrication process of Two mirrors among four of them are selected for the CFRP mirror. The prepreg consists of cyanate the present study (mirror no. 3 and 4 in Table 1). resin and high modulus continuous carbon fiber. To One is that buffing is implemented following make the surface flat, an optical flat glass is used as aluminum deposition, another is not. For the two a tool plate. The CFRP plates are fabricated using an mirrors, the surface treatments were removed and auto-clave method. Honeycomb core is inserted gel-coating, buffing and aluminum deposition were between fabricated CFRP plates. The honeycomb implemented again. If the prediction that the buffing core is made of identical materials. After bonding is effective to make the surface flatness and cure, the tool plates are demolded. The Gel-coating accuracy better is correct, it is expected that the is then implemented and buffing is done for a part of retreated surface should be improved even if the mirrors. The mirrors have relatively thin gel-coating previous measurement result of the mirror was bad. layer due to the buffing. Aluminum deposition is Further, since temperature dependence of the surface finally conducted. Figure 4 is the fabricated CFRP accuracy is another important factor, we examined mirrors. The dimensions are 100 x 100 x 30. On the that using normal heaters as shown in Fig. 5. The edge, the aluminum deposition is partially done. equipment measuring the surface accuracy has to be at constant temperature so that we only heat the mirrors directly as shown in Fig. 5. That results in existence of temperature distribution for the mirror. Heater Zygo interferometor Heater Grip Fig. 5 Schematic of measurement system Fig. 4 All CFRP sandwich mirrors [1]
TIME AND TEMPERATURE DEPENDENCE OF SURFACE ACCURACY OF HIGH-PRECISION CFRP MIRRORS Hence, we measured temperature distribution by a thermography. Measured surface roughness and exposure histories of mirrors from fabrication are summarized in Table 1. The results of mirror No. 1 and 2 are previously presented [1]. For No. 1 and 3, buffing following the gel-coating is implemented. For No. 2 and 4, buffing is not implemented. Initially, No. 1 and 3 show good surface roughness, 20nmRMS, on the other hand, No. 2 and 4 show relatively bad (a) No. 3 at room temperature roughness. All mirrors are exposed at some various harsh environments such as high temperature, high humidity, vacuumed condition and so on. Every surface deteriorated by the exposures. No. 1 and 3 showed still good surface roughness value compared with No. 2 and 4. After that, we left the mirrors at normal ambient condition for 1 year. It is expected that a shrinkage induced by physical aging progressed sufficiently and saturated during one year. The surface treatments of No. 3 and 4 were then removed. Newly, gel-coating and buffing are implemented for them. After that, a half year elapsed (b) No. 3 at elevated temperature and then we measured the surface roughness by the same way. For No. 3, the surface roughness was 53nmRMS. It remained almost unchanged compared with previous result. However, the surface roughness of No. 4 deteriorated drastically. It was 980nmRMS. As time elapsed, it was assumed the surface condition became bad due to the physical aging and so on. Both results are at ambient room temperature. When the mirrors are heated, the surface roughness of No. 3 was almost kept the same value and that of No. 4 was improved significantly. (c) No. 4 at room temperature Measured surface geometries are shown in Fig. 6. In Fig. 7, temperature distributions at the measurements are shown. Table 1 History from fabrication to measurement Mirror No. No. 1 No. 2 No. 3 No. 4 Fabrication Common Common Common Common Surface treatment Gel & Buff Gel only Gel & Buff Gel only Initial RMS (nm) 20 80 20 100 After harsh exposure 60 180 60 240 Long exposure - - 1 year 1 year (d) No. 4 at elevated temperature Re-treatment - - Gel & Buff Gel & Buff Fig 3 Measurement results by Zygo interferometer After long exposure - - 0.5 year 0.5 year Ambient temperature - - 53 980 Elevated temperature - - 54 730 3
Recommend
More recommend