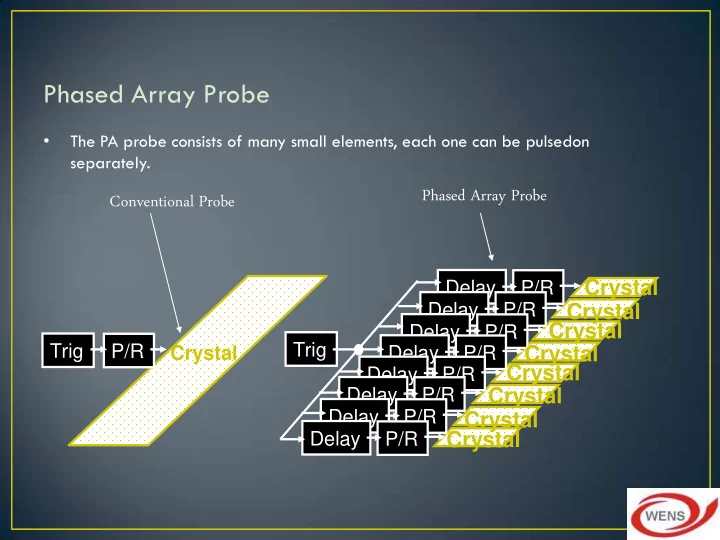

Phased Array Probe • The PA probe consists of many small elements, each one can be pulsedon separately. Phased Array Probe Conventional Probe Crystal Delay P/R Delay P/R Crystal Crystal Delay P/R Trig Trig P/R Delay Crystal Crystal P/R Crystal Delay P/R Delay P/R Crystal Delay P/R Crystal Delay P/R Crystal
Phased Array Probe • The PA probe consists of many small elements, each one can be pulsedon separately. Phased Array Probe Conventional Probe Crystal Delay P/R Delay P/R Crystal Crystal Delay P/R Trig Trig P/R Delay Crystal Crystal P/R Crystal Delay P/R Delay P/R Crystal Delay P/R Crystal Delay P/R Crystal
Weld Inspection Constant distance • The whole weld area can be covered with only one probe at a fixed position.
Simulation Overlay
• Sensitive to cracks at various orientations • Portability • Safety • Able to penetrate thick sections • Measures depth and through wall extent
Advantage of Phased Array Technology • Higher Inspection Sensitivity • Faster Inspection Efficiency • Stronger Inspection Capacity • Accurate Flaw Positioning • Visual Inspection Result
• No permanent record (unless automated) • Not easily applied to complex geometries and rough surfaces. • Unsuited to course grained materials • Requires highly skilled and experienced technicians
• Electromagnetic radiation is imposed upon a test object • Radiation is transmitted to varying degrees dependant upon the density of the material through which it is travelling • Variations in transmission detected by photographic film or fluorescent screens • Applicable to metals,non-metals and composites
Radiation Source Lower Higher density density Specimen Film
Placin ing Film to be radiograph aphed
X-Ray Tube Isotope opes s produce Gamma rays Examples: Co60, Ir192, Yb169
Panoram noramic ic Sing ngle e Wall Single e Image Doub uble e Wall Double e Image
• Safety X-ray machines is normally safer: can be switched off/on Gamma source: constant emission • Capabilities Gamma source have very high penetrating power X-ray: intensity and wavelength can be adjusted • Quality of images In general: x-ray produces better quality • Handling Gamma sources are easier to handle X-ray machine are bulky, fragile and requires electricity • Cost Gamma source are cheaper
• Permanent record • Detection of Internal flaws • Can be used on most materials • Direct image of flaws • Real - time imaging
• Health hazard • Sensitive to defect orientation • Limited ability to detect fine cracks • Access to both sides required • Limited by material thickness • Skilled interpretation required • Relatively slow • High capital outlay and running costs
• Transient stress waves from micro structural changes detected by sensors Stress waves Stress
Quality in execution of NDT operations demands attention to a series of interlinked aspects extending from research and development, codes and standards, equipment, personnel training and certification to the effects of human reliability and the influence of auditing and surveillance. These aspects can be represented as links in a chain as shown in Figure 1.
• Several years ago the two approaches to approval and certification (central, independent, third party and in-company) were seen as very different there now seems to be a gradual convergence of the two. Users of central certification are increasingly aware of the need for the central certification to be used in the correct way - as part of an organisation’s quality systems for NDT or written practice - and the guidelines for in- house, company based certification are bringing in requirements for external assessment e.g. independently certified Level 3s.
• * What do you think the Important factor in determining the Quality of NDT Results • HUMAN The UK’s PANI (Programme for the Assessment for NDT in Industry) projects have shown the variability in performance between ultrasonic operators of similar experience and qualification. PANI 2 showed that improvements in reliability can be obtained by the use of targeted procedures, job specific training and independent repeat inspections. PANI 3 which is due to be published has found a correlation between good ultrasonic performance and operators with good mechanical comprehension. There is also a correlation between good ultrasonic performance and operators with an average level of cautiousness and lower levels of original thinking. This project has also highlighted the importance of ensuring that the inspection procedure is written in a way that assists the operator in the task and that the operator follows the procedure.
CERTIFICATIONS AND QUALIFICATIONS NDT personnels should posses high credibility and integrity Proper training and certification required • Training : By qualified training personnels and accredited training centres • International Certification Schemes available: • ISO 9712:2011-? Will be the need
Currently, there are 28 laboratories accredited mainly for the following techniques: • PT • MT • UT • RT The industries which the NDT laboratories are serving largely in the oil & gas, petrochemical and general engineering industries
• Following Best Practices & with adequate qualified NDT personnel, we would be able to come out with Quality assured NDT Results. • Thank you • Q & A
• VISIT US & SUPPORT US TO JOIN • SINGAPORE INTERNATIONAL NDT CONFERENCE & EXHIBITION 2011 – NOVEMBER 3- 4 • THEME: NDT FOR SAFER WORLD • 2 Days event, Proceedings, Lunch & Tea provided • HOLIDAY INN ATRIUM • AUTRI MEMBERS REGISTRATION FEE $200.00 • NON MEMBERS REGISTRATION FEE $250.00 • For Registration , Please visit • www.ndtss.org.sg
Recommend
More recommend