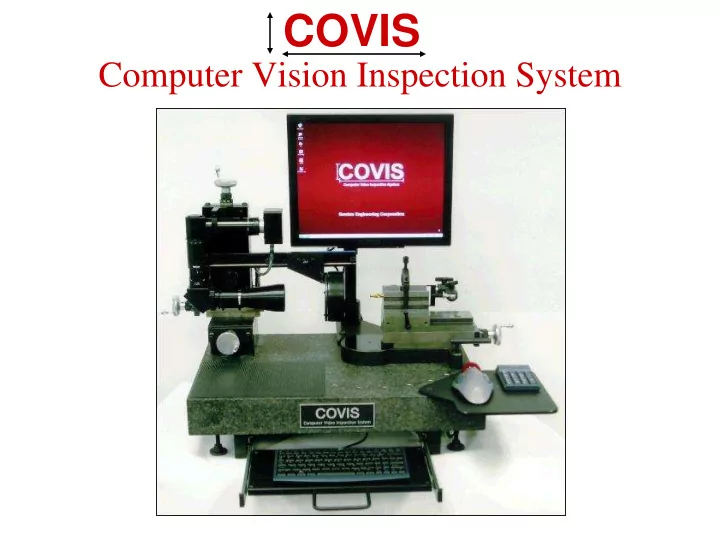

COVIS Computer Vision Inspection System
COVIS offers an immense universe of features and benefits: • Unequalled Speed and Efficiency • Instant Inspection Functions • True Photometric Measurement • Automatic Documentation • Off-line Management and Control • Genuine Multi-Tasking • Total Flexibility
COVIS The built- in “Contour Creation System” (CCS) allows shapes and features to be modeled and displayed on-screen with limits and tolerances of the most complex contours or the simplest of specifications, for instant at-a glance inspection. COVIS uses the power of true photometric digital image measurement, for fast and accurate, point-and-click, measurements without the potential errors of motion devices or physical positioning. A product image or view may be captured instantly, creating a stable “locked” image, problematic external influences common to other systems are eliminated. An image may be saved for further detailed inspection or for later evaluation, the actual product is no longer required, production can proceed.
COVIS Documentation is automatic: during the inspection process, each inspection request, calculation, and result is logged, including the date and time the function was performed, establishing the history log. The identification system allows for various labeling functions, time and date stamp, actual measurement results, pre-determined tags, text labeling, and the history log. Each image and the associated data may be stored, archived, recalled, printed, or transferred. Auditing of quality activities, historical review, long term process improvement, and customer verification requests are effortlessly.
COVIS Images captured from the production floor, or QA department can be viewed, measured and verified by other personnel in other areas of the plant, other buildings or even a another continent, via the off-line management and control features. The off-line software permits all inspection procedures, contour models, overlays, templates, detailed instructions and parameters for each job to be setup off-line and uploaded to COVIS. COVIS is designed to multi-task, store and retrieve complete inspection packages of instructions, parameters, and contour models. A simple click reconfigures the complete gauge for the requirements of the next operator or component or inspection type.
COVIS Helping reduce production/inspection bottlenecks. Make inspection and product verification procedures as efficient as production. Powerful, precise (resolution to .75 micron / .000028”) with magnification to 350X, COVIS enhances the most sophisticated inspection department yet intended to function on the shop floor in almost any reasonable environment. Our Lifetime Software Series Updating policy assures you of the most up-to-date version of the software, without additional cost.
COVIS Available in 3 standard models COVIS 25/25: for most cutting tools and small parts or details. 25 mm image area, 50mm x 50mm positioning range. .75 Micron Resolution / 350X magnification COVIS 25/50: built on the 25 size platform with a 50mm image area. 1.75 Micron Resolution / 175X magnification. COVIS 50/50: for larger, heavier workpieces 50mm image area, 75mm x 75mm positioning range 1.75 Micron Resolution / 175X magnification. COVIS Max: provides a platform for an almost unlimited range of custom applications and problem solving techniques.
COVIS Set-up and time consuming change-over from one requirement to the next is eliminated via quick change modular fixtures. Modular fixtures
Numerous small parts or families, multiple sided indexing turret makes switching from part to part instantaneous. Multi components
Using COVIS desktop software, inspection instructions, layouts, templates can be sent directly to the shop or inspection floor and inspection information from the floor back to the desktop, anywhere, anytime. Network integration
Check complex shapes fast and accurately without special tools or gages. Inspect an entire shape using contour templates with tolerance zones to identify in and out of tolerance features in one view. Even view and inspect features that may be obscured by another feature or detail in front of or behind the area to inspect that comparators can’t see and CMM’s can’t touch.
A cast aluminum housing with machined grooves. Using COVIS ortho-metric imaging technique, we can view the sides of the groove, looking for various conditions including porosity and finish Porosity on a side wall and measure it!
The surface of this extrusion has a machined seal contour consisting of numerous blended radii, angles positioned around a bore. Tolerance zone contouring provides instant evaluation of the entire shape, with inspection instructions.
Cutting tool features are also rapidly inspected with great speed and accuracy. COVIS’s zoom, up to 350X, and image enhancing allows for the most discriminating inspection of even the minutest detail. Complete with measurements, labels, time and date stamp and notes.
COVIS These are but a very few examples of applications, inspection techniques and types of inspection COVIS is capable of, the limits are now truly your imagination. COVIS brings to the industry, a technology and technique previously unheard of. To begin solving problems, improving efficiency and saving money: contact your authorized COVIS distributor today! COVIS is serious inspection
Recommend
More recommend