
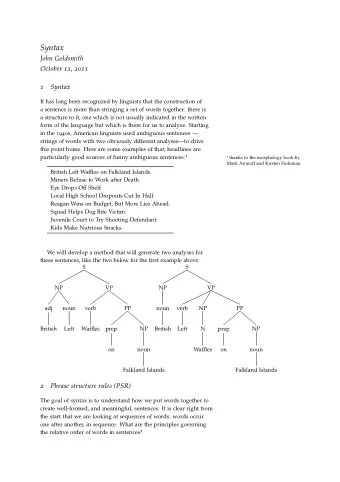
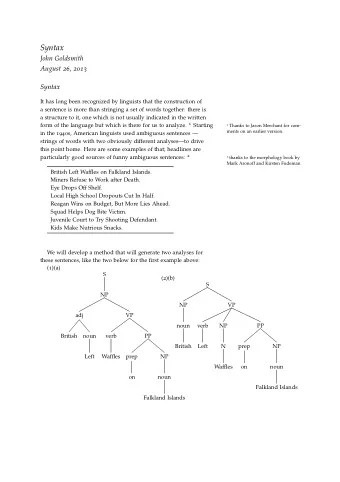
OpenPose for Linguists Maren Brumm, Marc Schulder, Thomas Hanke - PowerPoint PPT Presentation
Summer School 2019 Language Documentation and Corpus Technology OpenPose for Linguists Maren Brumm, Marc Schulder, Thomas Hanke Jointly organised by the long-term projects DGS-Korpus and INEL of the Academy of Sciences and Humanities in
Summer School 2019 Language Documentation and Corpus Technology OpenPose for Linguists Maren Brumm, Marc Schulder, Thomas Hanke Jointly organised by the long-term projects DGS-Korpus and INEL of the Academy of Sciences and Humanities in cooperation with the EU-funded project The Sign-Hub
Negation Devices in Sign Languages • Negation particles ✔ • Negation content words ✔ • Manual negation morphemes ( ✔ ) • Headshake (( ✔ )) • Facial expression ☹ 2
Headshake • Not part of core annotation. • But annotators were asked to add comments about further important observations. • Result: >7000 comments mentioning headshakes. 3
Headshake + Lexeme Negation Sign + HS Regular Sign + HS NO BRING no not brought 4
Headshake + Phrase HS negates phrase TOGETHER FIT TOGETHER NOT It has nothing to do with each other at all 5
Non-negating Headshake HS indicates negative sentiment ALL OFF - CLOSE TO - CLOSE All of them have been closed down 6
Manual Annotation is slow and expensive, so… • Approach 1: Use German translations • Reduces annotation effort, doesn’t replace it • Can only find negation headshakes • Approach 2: Use the visual domain 7
Into the Visual Domain: OpenPose (CMU) 8
OpenPose 2018 9
Detecting Headshakes in OpenPose Data Track movement of the nose, relative to face contour. 10
Detecting Headshakes in OpenPose Data 1.Run Open Pose. 2.Train a neural network classifier to • detect headshakes in time series data; • determine duration of headshakes. 11
Neural Network Training Challenges • Need annotator comments to train classifier, but time spans of comments are unreliable: • span is for sign, not headshake; • comment combines two observations, e.g. “constructed action + headshake”. ➡ Comments indicate existence of headshake, but not time span. ➡ Translations may fulfil a similar function. 12
Uses for OpenPose ● Automatic annotation when human annotation not feasible. ● First pass annotation to assist annotator. ● Quality Assurance: Find annotator mistakes. 13
14
OpenPose Output 1 File per Frame Hint: Open in an editor with syntax highlighting, e.g. Atom 15
OpenPose JSON Output 16 Photographer: Helen Graham Subject: Snuggles
OpenPose JSON Output 17 Photographer: Helen Graham Subject: Snuggles
Indented JSON Output 18
Keypoint Values Keypoint 0 Keypoint 1 Keypoint 2 19
X-Axis Confidence Y-Axis 0 720 1 0.845 600 120 0.8 240 480 0.6 Pixel 360 0.4 480 240 0.2 600 120 720 0 0 0 256 512 768 1024 1280 Confidence Pixel 20
Side Note: Multiple People 21
Technical Requirements Video: ● High resolution video (HD or 4K) ● 50 Frames per Second (lower framerate = more blur) ● High contrast background Running OpenPose: ● Minimum: A fast modern computer ● Intermediate: Use graphics cards (GPU) for computations (more setup, but x2-30 faster) ● Best: High Performance Cluster 22
Running OpenPose on DGS Corpus ● 550 hours or recordings. ● 3 camera perspectives per recording. ● 1 hour recording = 87 hours processing (double-GPU machine) Processing Time: ● Single computer: 5 ½ years ● High Performance Cluster: 4 months 23
OpenPose Installation Windows: ● Download demo from https://github.com/CMU-Perceptual- Computing-Lab/openpose/releases ● Double click on models/getModels.bat to download the required body, face, and hand models ● You’re done :-) Mac/Linux: ● Complicated :-( ● Follow instructions at https://github.com/CMU-Perceptual- Computing-Lab/openpose/blob/master/doc/installation.md ● For Mac we provide scripts that should install everything. 24
OpenPose Installation Mac: ● Start Terminal . ● Navigate to the class folder by writing “ cd “ and drag-and-dropping the class folder into Terminal . ● Install Python 3: bash install_python3.sh ● Install OpenPose: bash install_openpose.sh 25
Run OpenPose Windows: ● Open programme: Windows Command Prompt ● Navigate to OpenPose main folder (e.g. cd C:/openpose ) ● bin\OpenPoseDemo.exe --video examples\media\video.avi Mac/Linux: Replace with path ● Open programme: Terminal to your video ● Navigate to OpenPose main folder (e.g. cd ~/openpose ) ./build/examples/openpose/openpose.bin --video examples/media/video.avi ● 26
Additional options Add any of the following bits to the end of the command from the previous slide: ● Enable face keypoint detection: --face ● Enable hand keypoint detection: --hand ● Save points to file: --write_json outputfolder/ --display 0 -- render_pose 0 ● Many more (e.g. higher accuracy settings) on https://github.com/CMU-Perceptual-Computing-Lab/ openpose/blob/master/doc/demo_overview.md 27
Don’t want to run OpenPose yourself? Use DGS Corpus data :-) 28
OpenPose detects keypoints on a body. OpenPose does NOT tell you what a movement means . For that you need to write a classification program. 29 Photographer: Helen Graham Subject: Snuggles
OpenPose detects keypoints on a body. OpenPose does NOT tell you what a movement means . For that you need to write a classification program. 30 Photographer: Helen Graham Subject: Snuggles
Programming 101 ● Our interactive tutorial uses Python. ● Python is extremely popular with researchers: ● It is quick to learn. ● It is easy to read. ● It allows quick experimentation. ● There are loads of external libraries (i.e more functionalities) ● It was named after Monty Python Source: Wikipedia 31
How to access the exercises Mac: ● Make sure you have installed Python 3 and the opencv package (easiest way: use our installer script) ● Start Terminal . ● Type: jupyter notebook ● Press enter and wait for the Notebook to open in your browser. ● Navigate to the summer school class directory. ● Click on the .ipynb file of your choice. 32
How to access the exercises Windows: ● Install the Python 3 version of Anaconda ● Use Anaconda Navigator to install the opencv package ● Go to Windows Start Menu -> Anaconda3 -> Jupyter Notebook ● Navigate to the summer school class directory. ● Click on the .ipynb file of your choice. 33
Any Questions? 34
Recommend


More recommend
Explore More Topics
Stay informed with curated content and fresh updates.