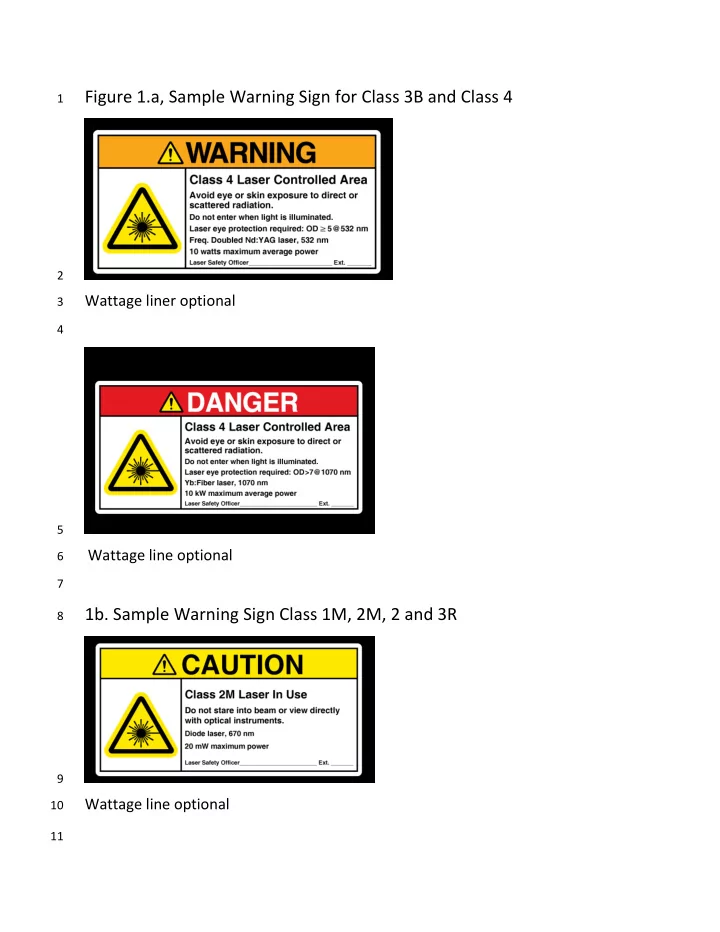

Figure 1.a, Sample Warning Sign for Class 3B and Class 4 1 2 Wattage liner optional 3 4 5 Wattage line optional 6 7 1b. Sample Warning Sign Class 1M, 2M, 2 and 3R 8 9 Wattage line optional 10 11
Figure 1c. ANSI Z353.2 Compliant Laser Area Warning Sign Formats 12 13 14 15 16 17 18 19 20 21 22 23 24 25 26
Figure: 2 Laser Warning Signs that have been grandfathered by Z136.1 27 28 29 Would now apply to Kilowatt laser system 30 31 32 Application has not changed 33 34 35 Application would not change, but a strict interpretation of ANSI sign standard, 36 would remove wording on eyewear use 37 38 39
Figure 3 Exterior if LCA Entryway Class 4 Lasers Utilizing a positive 40 access mechanism (interlock, electronic lock) 41 42 43 44 45 46 47 Warning light too high, 48 laser on indicator over 49 door frame out of line of 50 51 sight, poor location 52 53 54 55 Better position 56 for illuminated 57 warning sign 58 59 ANSI 60 Warning Sign 61 62 Interlock by pass key pad, in 63 some situations could be 64 replaced by an electronic or 65 card swipe system (which 66 would prevent unauthorized 67 access, but not affect laser). 68 69 70 71 72 Figure Key & Additional Comments: 73 74 1. ANSI Warning sign, can be integrated into Institution Hazard Communication Posting, but must contain 75 required information, not just laser symbol 76 2. Illuminated Warning sign most commonly indicates that power is on to the laser, not that the beam is 77 accessible. This can be corrected with a dual or tri-light system or programmable digital or flat screen sign. 78 3. Missing from figure is Emergency Stop button, LSO needs to determine if this is required as well as 79 possible alternatives to the red mushroom crash button, indication to wear circuit breaker is located. 80 4. Light over door frame with no indication of its function can lead to false impressions to area staff and 81 visitors
Figure 4 Class 4 laser lab 82 83 Laser free zone Eyewear holder inside & out Illuminated warning 84 85 Entry key pad Warning sign (grandfathered version) 86 Note: This example shows a laser free zone upon entry (dog leg maze). Eyewear, SOPs, Safety 87 notices, bench to put on booties are examples of items that could be in this area. This also 88 prevents stray beams from exiting LCA. 89 90 91 92 93 94 95
Figure 5 Perimeter guard around optical table 96 97 98 99 Perimeter guard, purpose to contain beams and reflections on the optical table. 100 Best practice is to have the guard made with a diffuse surface, at least on the 101 inside and to be noncombustible for the laser output in use. 102 1. Guard walls need to be higher than optics on post,8- 12 inches works well. 103 Depending on how installed, sections can be removed for access. 104 2. A step on platform or step stool will allow greater access to center of table, 105 this avoids lend in and back strain. 106 3. Over any periscope optics should have a cover or block a best practice is to 107 label it indicating upward beams present. 108 4. Optical tables with energized equipment on them need to be grounded. 109 5. If shelves are hanging over optical table, the edges of such shelves need to 110 be padded (pipe instillation works very well for this). 111 6. Note this set up only allows access from three sides, this might create 112 safety concerns or be acceptable due to space limitations in LCA. 113 114
Recommend
More recommend